React-server-component
이미 발표는 애진작에(?) 되었지만 아직 발표는 더디기만 한 react-server-component(이하 rsc)에 대해 알아보겠습니다.
설명
첫 발표는 20년 12월에 되었습니다. 그 당시 next.js를 막 사용하기 시작하던 때라 rsc에는 큰 관심이 없었습니다. 하지만 next.js 프로젝트가 끝나고 유지보수를 하면서 프레임워크 자체 무게로 인해 생각했던 것보다 (성능적인 부분까지 체크하진 않았으나) 노출되는 속도라던지 반응속도가 느리게 느껴졌습니다. 이런 생각을 저만 했다면 server-side-rendering(이하 ssr)에서 더 큰 발전 방향을 생각하지 못했을지 모릅니다.
rsc란 뭘까요? 말 그대로 component를 서버에서 불러온다는 의미의 server component입니다. 그 구조는 아래와 같습니다.
기존의 client-side-rendering(이하 csr)은 위와 같이 서버와 통신했습니다. 처음 client에서 호출이 들어오면 서버에서 static 파일들을 보내주고, client에서 데이터를 fetch하면 데이터를 보내주고.
ssr은 어떨까요? 구조는 위 csr과 동일합니다. 그 대신 처음에 client에서 호출이 들어올 때, 초기 구성 데이터를 호출해 static 파일들과 같이 내려주는 방식인 것이죠.
rsc는 왜 데이터만 내려보내줘? 라는 것에 의문을 둔 것이죠
데이터와 react component를 합쳐 클라이언트로 내려주는 것입니다. 브라우저에서 static 파일을 불러오고 dom을 구성하기 위한 react 관련 파일, library를 불러오는 것 대신 서버에서 react에서 compile된 직렬화 데이터를 내려주기 때문에 리소스 측면에서, 속도 측면에서 모두 이점을 가지게 됩니다.
동작
파일명을 *.server.jsx, *.client.jsx 로 잡으면 react가 런타임 시 잡아주게 됩니다. (bundler의 설정이 필요할 수 있음) 따라서 파일명에 따라 간단하게 특정 페이지는 rsc, 특정 페이지는 csr을 하는 등의 구성을 가질 수 있게 됩니다.
눈치 채신 분들도 있으시겠지만, client파일 내에 server 파일을 import할 수 없습니다. 반대의 경우는 물론 가능합니다. 또한 server파일은 직렬화 해서 client로 내려가기 때문에 함수나 이벤트와 같은 내용은 client로 전달할 수 없습니다.
현재 설정이 쉽지 않아 React 측에서도 shofify와 next.js에서 해당 기능을 만들면 해당 기능을 사용하라고 권장하고 있습니다. 해당 post에서는 기본적인 동작만 알아보겠습니다.
React에 올라왔던 rsc 문서 https://reactjs.org/blog/2020/12/21/data-fetching-with-react-server-components.html와 해당 문서의 영상에서 설명해주는 demo link 의 코드를 바탕으로 확인해보겠습니다.
처음 프로젝트를 시키는 명령어인 npm start 명령어부터 따라가 봅시다.
server 실행을 위해 nodemon -- --conditions=react-server server, client 번들링을 위해 위해 nodemon -- scripts/build.js을 하고 있습니다.
동작 - client
client부터 보자면
build/index.html에서 main.js를 호출합니다.- 최하단에 아래와 같은 코드로 entry point가 index.client.js 라는 것을 알 수 있습니다.
/************************************************************************/
/******/
/******/ 	// startup
/******/ 	// Load entry module and return exports
/******/ 	// This entry module is referenced by other modules so it can't be inlined
/******/ 	var __webpack_exports__ = __webpack_require__("./src/index.client.js");
/******/
/******/ })()
;
//# sourceMappingURL=main.js.map- Root.client.js가 실행합니다. (여기서 해당 bootstrap의 페이지 자체 렌더링은 csr로 돌리고 있음을 알 수 있음)
- Root.client.js 안에서 Content 함수를 호출합니다.
function Content() {
  const [location, setLocation] = useState({
    selectedId: null,
    isEditing: false,
    searchText: '',
  });
  const response = useServerResponse(location); // server와 관련된 일을 함을 알 수 있음
  return (
    <LocationContext.Provider value={[location, setLocation]}>
      {response.readRoot()}
    </LocationContext.Provider>
  );
}- cache는 말 그대로 호출된 rsc 데이터를 저장하는 역할인데, location이란 param을 받아 서버에서 데이터를 받고 cache에 저장합니다.
export function useServerResponse(location) {
  const key = JSON.stringify(location);
  const cache = unstable_getCacheForType(createResponseCache);
  let response = cache.get(key);
  if (response) {
    return response;
  }
  response = createFromFetch(
    fetch('/react?location=' + encodeURIComponent(key));
  );
  cache.set(key, response);
  return response;
}
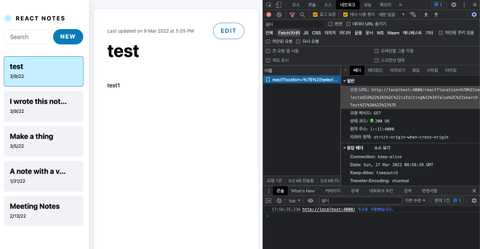
server 코드를 확인하기 전에 브라우저에서 /react?location= 이 어떻게 실행되는지 확인해봅시다.

키워드 하나를 클릭했더니 param은 location: {"selectedId":5,"isEditing":false,"searchText":""} 이와 같이 들어왔습니다.
결과는 아래와 같습니다.
M1:{"id":"./src/SearchField.client.js","chunks":["client5"],"name":""}
M2:{"id":"./src/EditButton.client.js","chunks":["client1"],"name":""}
S3:"react.suspense"
J0:["$","div",null,{"className":"main","children":[["$","section",null,{"className":"col sidebar","children":[["$","section",null,{"className":"sidebar-header","children":[["$","img",null,{"className":"logo","src":"logo.svg","width":"22px","height":"20px","alt":"","role":"presentation"}],["$","strong",null,{"children":"React Notes"}]]}],["$","section",null,{"className":"sidebar-menu","role":"menubar","children":[["$","@1",null,{}],["$","@2",null,{"noteId":null,"children":"New"}]]}],["$","nav",null,{"children":["$","$3",null,{"fallback":["$","div",null,{"children":["$","ul",null,{"className":"notes-list skeleton-container","children":[["$","li",null,{"className":"v-stack","children":["$","div",null,{"className":"sidebar-note-list-item skeleton","style":{"height":"5em"}}]}],["$","li",null,{"className":"v-stack","children":["$","div",null,{"className":"sidebar-note-list-item skeleton","style":{"height":"5em"}}]}],["$","li",null,{"className":"v-stack","children":["$","div",null,{"className":"sidebar-note-list-item skeleton","style":{"height":"5em"}}]}]]}]}],"children":"@4"}]}]]}],["$","section","5",{"className":"col note-viewer","children":["$","$3",null,{"fallback":["$","div",null,{"className":"note skeleton-container","role":"progressbar","aria-busy":"true","children":[["$","div",null,{"className":"note-header","children":[["$","div",null,{"className":"note-title skeleton","style":{"height":"3rem","width":"65%","marginInline":"12px 1em"}}],["$","div",null,{"className":"skeleton skeleton--button","style":{"width":"8em","height":"2.5em"}}]]}],["$","div",null,{"className":"note-preview","children":[["$","div",null,{"className":"skeleton v-stack","style":{"height":"1.5em"}}],["$","div",null,{"className":"skeleton v-stack","style":{"height":"1.5em"}}],["$","div",null,{"className":"skeleton v-stack","style":{"height":"1.5em"}}],["$","div",null,{"className":"skeleton v-stack","style":{"height":"1.5em"}}],["$","div",null,{"className":"skeleton v-stack","style":{"height":"1.5em"}}]]}]]}],"children":"@5"}]}]]}]
M6:{"id":"./src/SidebarNote.client.js","chunks":["client6"],"name":""}
J4:["$","ul",null,{"className":"notes-list","children":[["$","li","5",{"children":["$","@6",null,{"id":5,"title":"test","expandedChildren":["$","p",null,{"className":"sidebar-note-excerpt","children":"test1"}],"children":["$","header",null,{"className":"sidebar-note-header","children":[["$","strong",null,{"children":"test"}],["$","small",null,{"children":"3/9/22"}]]}]}]}],["$","li","4",{"children":["$","@6",null,{"id":4,"title":"I wrote this note today","expandedChildren":["$","p",null,{"className":"sidebar-note-excerpt","children":"It was an excellent note."}],"children":["$","header",null,{"className":"sidebar-note-header","children":[["$","strong",null,{"children":"I wrote this note today"}],["$","small",null,{"children":"3/9/22"}]]}]}]}],["$","li","3",{"children":["$","@6",null,{"id":3,"title":"Make a thing","expandedChildren":["$","p",null,{"className":"sidebar-note-excerpt","children":"It's very easy to make some words bold and other words italic with Markdown. You can even link to React's..."}],"children":["$","header",null,{"className":"sidebar-note-header","children":[["$","strong",null,{"children":"Make a thing"}],["$","small",null,{"children":"3/5/22"}]]}]}]}],["$","li","2",{"children":["$","@6",null,{"id":2,"title":"A note with a very long title because sometimes you need more words","expandedChildren":["$","p",null,{"className":"sidebar-note-excerpt","children":"You can write all kinds of amazing notes in this app! These note live on the server in the notes..."}],"children":["$","header",null,{"className":"sidebar-note-header","children":[["$","strong",null,{"children":"A note with a very long title because sometimes you need more words"}],["$","small",null,{"children":"1/31/22"}]]}]}]}],["$","li","1",{"children":["$","@6",null,{"id":1,"title":"Meeting Notes","expandedChildren":["$","p",null,{"className":"sidebar-note-excerpt","children":"This is an example note. It contains Markdown!"}],"children":["$","header",null,{"className":"sidebar-note-header","children":[["$","strong",null,{"children":"Meeting Notes"}],["$","small",null,{"children":"2/13/22"}]]}]}]}]]}]
J5:["$","div",null,{"className":"note","children":[["$","div",null,{"className":"note-header","children":[["$","h1",null,{"className":"note-title","children":"test"}],["$","div",null,{"className":"note-menu","role":"menubar","children":[["$","small",null,{"className":"note-updated-at","role":"status","children":["Last updated on ","9 Mar 2022 at 5:05 PM"]}],["$","@2",null,{"noteId":5,"children":"Edit"}]]}]]}],["$","div",null,{"className":"note-preview","children":["$","div",null,{"className":"text-with-markdown","dangerouslySetInnerHTML":{"__html":"<p>test1</p>\n"}}]}]]}]
(추가적으로 여러 시도를 해봤더니 아래와 같은 param이 들어옴을 알 수 있었습니다)
location: {"selectedId":null,"isEditing":true,"searchText":""} // new
location: {"selectedId":5,"isEditing":true,"searchText":""} // edit
location: {"selectedId":5,"isEditing":true,"searchText":"as"} // edit + search
location: {"selectedId":1,"isEditing":false,"searchText":""} // choose other note
잠깐 둘러보더라도 서버에서 react를 compile한 결과의 정보들을 나열해놓은 것이라 여겨집니다. 그렇다면 이제 해당 코드가 어떻게 나오게 되는지 server쪽을 확인해보겠습니다.
동작 - server
server 디렉토리의 package.json의 main property는 ./api.server.js 로 가지고 있으니 해당 파일로 실행이 됩니다.
- client 1번에서
build/index.html이 실행된다고 했는데 78L에 해당 내용이 있습니다.
app.get('/', handleErrors(async function(_req, res) {
  await waitForWebpack();
  const html = readFileSync(
    path.resolve(__dirname, '../build/index.html'),
    'utf8'
  );
  res.send(html);
}));- 그 다음 우리가 궁금한
/react?locaiton=이 어떻게 나오는지 확인해보겠습니다.
async function renderReactTree(res, props) {
  await waitForWebpack();
  const manifest = readFileSync(
    path.resolve(__dirname, '../build/react-client-manifest.json'),
    'utf8'
  );
  const moduleMap = JSON.parse(manifest);
  const {pipe} = renderToPipeableStream(
    React.createElement(ReactApp, props),
    moduleMap
  );
  pipe(res);
}

function sendResponse(req, res, redirectToId) {
  const location = JSON.parse(req.query.location);
  if (redirectToId) {
    location.selectedId = redirectToId;
  }
  res.set('X-Location', JSON.stringify(location));
  renderReactTree(res, {
    selectedId: location.selectedId,
    isEditing: location.isEditing,
    searchText: location.searchText,
  })
}

app.get('/react', function(req, res) {
  sendResponse(req, res, null);
});
sendResponse에서 location에 대해 spread하여 renderReactTree로 넘기는 것을 보니, 실제 서비스에 rsc를 적용한다면 기능별 rsc endpoint가 나뉠수도 있을 것으로 예상해볼 수 있습니다.
아마 return을 하지 않아도 제일 마지막 stack인 renderReactTree의 pipe(res)까지 response를 넘기는 것을 보니, res에 값을 싣는 과정이 pipe에 들어가 있을 것 같습니다.
결국 모든 기능은 renderReactTree 함수 내부의 renderToPipeableStream 기능이 하는 것입니다. React.createElement(ReactApp, props)
ReactApp와 props를 서버에서 compile하고 pipe를 통해 res에 싣는 것이죠.
bootstrap 코드를 따라가보니 그나마 쉽게 이해할 수 있었습니다. 마지막으로 하나 더 볼 부분은 webpack입니다.
처음에 npm run bundler:dev 가 실행됨을 말씀드렸는데 webpack plugin에 아래와 같은 코드가 있습니다. isServer는 아직 의미가 없네요^^;
new ReactServerWebpackPlugin({isServer: false})
// node_modules/react-server-dom-webpack/cjs/react-server-dom-webpack-plugin.js#L55
// if (options.isServer) {
//   throw new Error('TODO: Implement the server compiler.');
// }
이렇게 간단하게 주요한 rsc 로직에 대해서만 demo 코드 기준으로 알아보았습니다. (node crud 코드는 생략) 컨셉은 좋지만, SSR을 프레임워크 없이 사용했던 경험과 유사한 복잡도지 않나 생각이 드네요. shofify에서는 이미 해당 기능을 추가해놨고, next.js에서도 demo를 열심히 작업하는 것을 보니 한창 작업 중인 것으로 예상됩니다.
FE개발자는 트렌트가 바뀔때마다 바빠지는데 앞으로 또 어떻게 바빠지고 재밌어질 지 궁금하네요.

